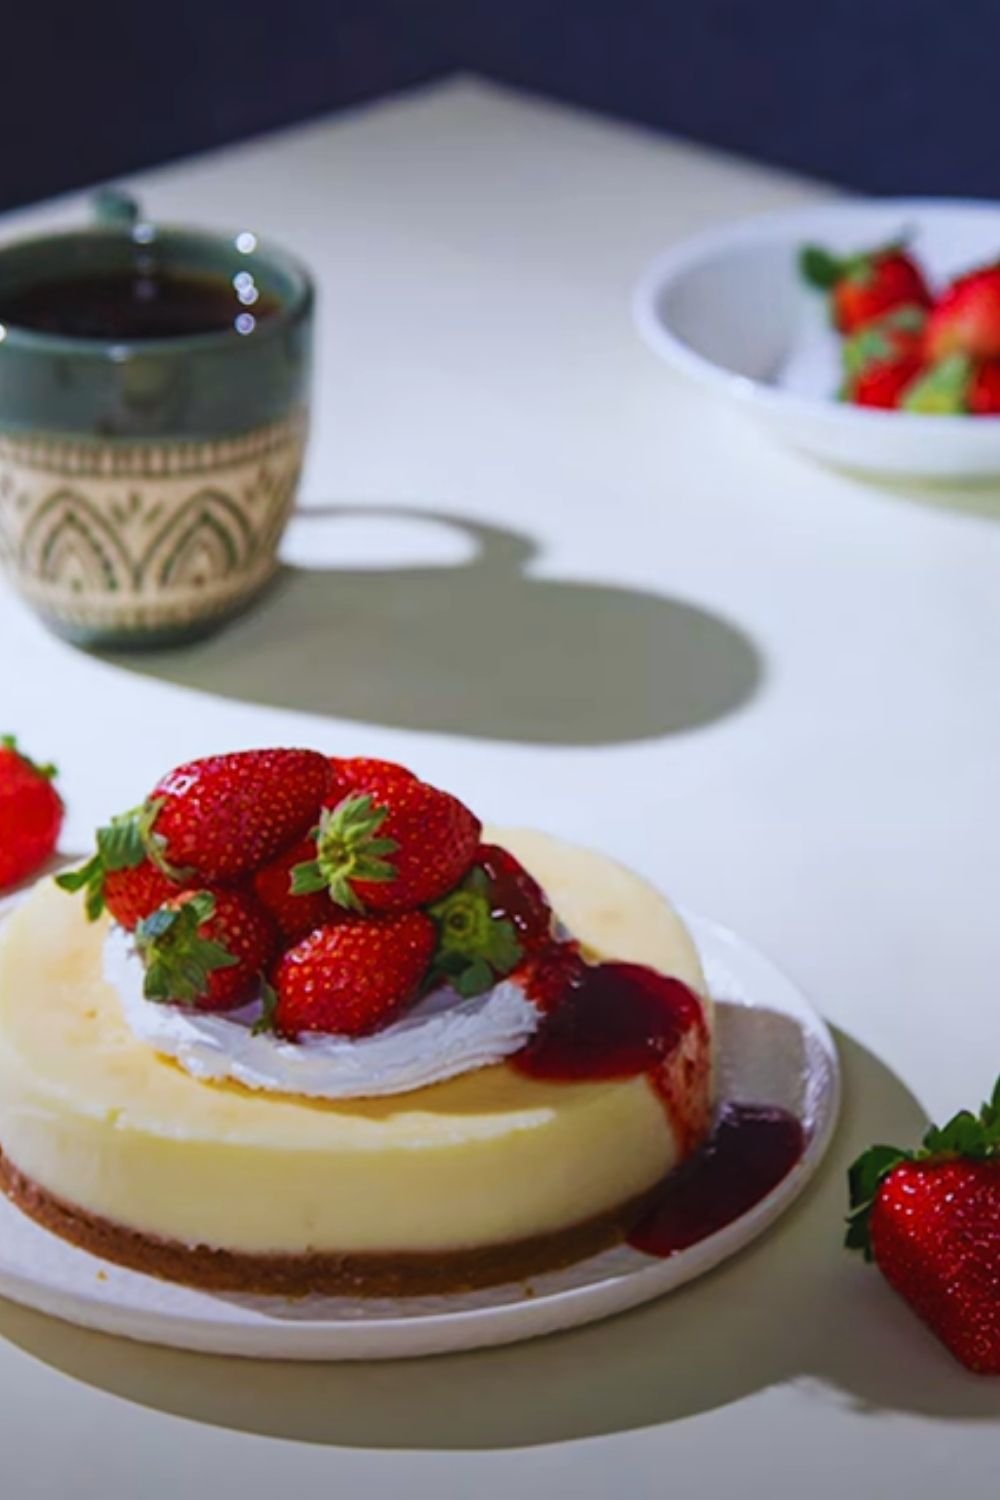
There’s something magical about a perfectly executed New York cheesecake. That first bite—where the fork glides through the velvety cream cheese filling, the subtle vanilla notes dance on your palate, and the buttery graham cracker crust provides just the right textural contrast—it’s nothing short of transcendent. I’ve spent years perfecting my cheesecake technique, and today I’m sharing everything I know about creating the quintessential New York-style cheesecake that will have your guests begging for your secrets.
Unlike its fluffier Japanese or Italian counterparts, the classic New York cheesecake is unapologetically rich, dense, and creamy. It doesn’t hide behind fancy toppings or complex flavors (though I’ll share some delicious variations later). Instead, it celebrates the pure, tangy perfection of quality cream cheese transformed into a dessert that has stood the test of time since the 1900s when dairymen in New York began producing cream cheese in earnest.
What Makes a New York Cheesecake Special?
A true New York cheesecake isn’t just any cheesecake. What distinguishes this iconic dessert from other varieties is its signature texture and flavor profile. Here are the defining characteristics:
- Density: Unlike lighter, airier variations, a New York cheesecake is rich and substantial.
- Creaminess: The texture is silky-smooth and velvety against the palate.
- Height: Properly made, it stands tall and proud at 2-3 inches.
- Flavor: Distinctly tangy from cream cheese with pronounced vanilla notes.
- Simplicity: The focus is on the cream cheese filling rather than elaborate toppings.
- Baking method: It’s typically baked in a water bath for gentle, even cooking.
Essential Ingredients for the Perfect Cheesecake
Before we dive into technique, let’s talk ingredients. When making a dish with so few components, quality matters tremendously:
The Foundation: Cream Cheese
The star of the show deserves special attention. For authentic New York cheesecake:
Full-fat cream cheese : The only acceptable option; provides richness and proper texture Philadelphia brand : Many bakers (myself included) swear by this specific brand for its consistent texture and perfect tang Room temperature : Non-negotiable for achieving a smooth, lump-free batter
The Supporting Cast
These ingredients might play secondary roles, but each is crucial to the final result:
Eggs : Provide structure while maintaining creaminess Heavy cream : Adds richness and ensures proper texture Sugar : Balances the tanginess of the cream cheese Sour cream : The secret ingredient that gives New York cheesecake its characteristic flavor Vanilla extract : Use real, not imitation, for the best flavor Lemon zest (optional) : A subtle brightness that enhances without overwhelming
The Crust Components
The perfect foundation for your cheesecake:
Graham crackers : The traditional choice for New York cheesecake Butter : Unsalted and melted to bind the crumbs Sugar : Just enough to enhance the graham flavor Salt : A pinch balances the sweetness
Equipment You’ll Need
Having the right tools makes crafting the perfect cheesecake much easier:
| Equipment | Purpose | Recommendation |
|---|---|---|
| Springform Pan | Allows for clean removal | 9-inch heavy-duty pan with tight seal |
| Stand Mixer or Hand Mixer | Achieves smooth batter without overworking | KitchenAid or similar quality brand |
| Parchment Paper | Prevents sticking | Pre-cut rounds save time |
| Large Roasting Pan | For water bath baking | Must be larger than your springform |
| Instant-Read Thermometer | For perfect doneness | Digital for accuracy |
| Offset Spatula | For smooth top finishing | Small or medium size works best |
| Heavy-Duty Aluminum Foil | Water bath protection | Extra-wide sheets are ideal |
| Fine Mesh Sieve | For lump-free filling | Stainless steel is most durable |
The Definitive New York Cheesecake Recipe
Now for the moment you’ve been waiting for—my meticulously tested recipe that yields the perfect New York cheesecake every time.
Ingredients
For the Crust:
- 2 cups graham cracker crumbs (about 15-16 full sheets)
- 1/4 cup granulated sugar
- 1/2 cup (1 stick) unsalted butter, melted
- 1/4 teaspoon fine sea salt
For the Filling:
- 4 (8-ounce) packages full-fat cream cheese, room temperature
- 1 1/4 cups granulated sugar
- 1/2 cup sour cream, room temperature
- 2 teaspoons pure vanilla extract
- 1 teaspoon fresh lemon zest (optional)
- 4 large eggs plus 1 egg yolk, room temperature
- 3 tablespoons all-purpose flour
- 1/4 cup heavy cream, room temperature
Instructions
Prepare Your Ingredients and Equipment
- Set all refrigerated ingredients out 2 hours before beginning.
- Preheat your oven to 325°F (165°C).
- Wrap the outside of a 9-inch springform pan with three layers of heavy-duty aluminum foil, bringing it up the sides to ensure no water seeps in during baking.
- Lightly grease the inside of the pan with butter or cooking spray.
Make the Crust
- Combine graham cracker crumbs, sugar, and salt in a medium bowl.
- Pour in melted butter and mix until the mixture resembles wet sand.
- Press firmly into the bottom and about 1 inch up the sides of your prepared springform pan. Use a flat-bottomed measuring cup to compact it evenly.
- Bake for 10 minutes until lightly golden. Remove and cool on a rack while preparing the filling.
- Reduce oven temperature to 300°F (150°C).
Create the Filling
- In the bowl of a stand mixer fitted with the paddle attachment, beat cream cheese on medium-low speed until completely smooth and free of lumps, about 3 minutes.
- Add sugar gradually and continue beating until incorporated and smooth, about 2 minutes more. Scrape down sides and bottom of bowl frequently during mixing.
- Add sour cream, vanilla extract, and lemon zest (if using). Beat until combined.
- Add eggs one at a time, beating just until each is incorporated. Add the extra yolk last. Do not overmix after adding eggs.
- Add flour and beat on low until just combined.
- Finally, add heavy cream and mix just until smooth. The batter should be silky and somewhat thick.
Baking Process

- Pour the batter into the cooled crust and smooth the top with an offset spatula.
- Tap the pan gently on the counter several times to release any trapped air bubbles.
- Place the foil-wrapped springform pan in a larger roasting pan.
- Place the roasting pan in the oven and carefully pour hot water into the roasting pan until it reaches about halfway up the sides of the springform pan.
- Bake for 1 hour and 15 minutes. The cheesecake should still be slightly wobbly in the center but set around the edges.
- Turn off the oven, crack the door open about an inch, and leave the cheesecake in the oven for another hour.
- Remove from the oven and water bath. Carefully remove foil and cool completely on a wire rack.
- Once at room temperature, refrigerate for at least 8 hours, preferably overnight.
The Science Behind the Perfect Cheesecake
Understanding why certain techniques work helps ensure consistently excellent results:
Why Room Temperature Ingredients Matter
Cold cream cheese is nearly impossible to beat smooth, resulting in a lumpy batter. Room temperature ingredients also incorporate air more efficiently, creating the ideal texture.
The Water Bath Method
The water bath serves two critical functions:
- Even heating: Water moderates the temperature around the cheesecake, preventing the edges from cooking too quickly.
- Humidity: Creates a moist environment that prevents cracking and ensures silky texture throughout.
The Cooling Process
The gradual cooling process is as important as the baking itself:
- Allowing the cheesecake to cool slowly in the turned-off oven prevents the dramatic temperature change that causes cracking.
- The refrigeration period allows flavors to develop and the texture to set properly.
Troubleshooting Common Cheesecake Problems
Even experienced bakers encounter issues occasionally. Here’s how to fix or prevent the most common problems:
| Problem | Likely Cause | Solution |
|---|---|---|
| Cracked surface | Overbaking or rapid temperature changes | Use water bath, proper cooling, don’t overmix eggs |
| Lumpy texture | Cold ingredients or inadequate mixing | Ensure room temperature ingredients, beat cream cheese thoroughly |
| Soggy crust | Water leakage from bath | Use multiple layers of heavy-duty foil, consider using a silicone wrap |
| Sunken center | Underbaking or opening oven door | Check for proper doneness, resist peeking during baking |
| Too dense/heavy | Overmixing or incorrect measurements | Mix just until combined after adding eggs, use kitchen scale |
| Browned top | Oven too hot | Reduce temperature, position rack in middle of oven |
Creative Variations While Respecting Tradition
While purists might argue that a classic New York cheesecake needs no embellishment, these variations maintain the integrity of the original while offering delightful twists:
Flavor Infusions
- Citrus: Add 1 tablespoon of orange or lemon zest to the batter
- Espresso: Dissolve 1 tablespoon instant espresso powder in 1 tablespoon hot water, cool, then add to batter
- Vanilla bean: Replace extract with seeds from 1 vanilla bean
- Almond: Add 1/2 teaspoon almond extract to the batter
Topping Ideas

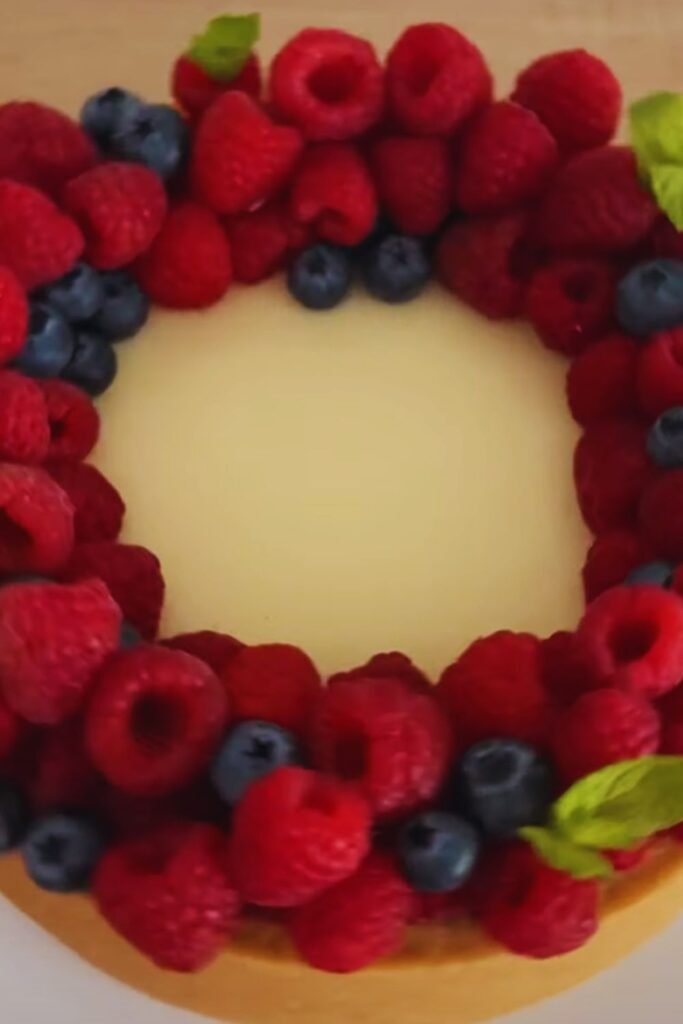
While a true New York cheesecake can stand proudly on its own, these toppings complement without overwhelming:
- Fresh berries: Macerate slightly with a touch of sugar
- Fruit compote: Blueberry, strawberry, or raspberry (not too sweet)
- Lemon curd: Thinly spread for a tangy contrast
- Dark chocolate ganache: A thin layer adds elegant richness
- Caramel sauce: Use sparingly to avoid excessive sweetness
Serving Suggestions
The way you serve cheesecake affects the experience just as much as how you make it:
- Temperature matters: Remove from refrigerator 30 minutes before serving for optimal texture and flavor.
- Slice with precision: Dip a long, thin knife in hot water, wipe clean, and slice. Repeat between cuts.
- Keep it simple: Serve on chilled plates with minimal garnish.
- Complementary beverages: Hot coffee, espresso, or tea provides perfect contrast to the rich dessert.
- Portion control: Small slices are appropriate given the richness—a little goes a long way.
Storage and Make-Ahead Tips
One of the joys of cheesecake is that it’s an ideal make-ahead dessert:
- Refrigeration: Properly wrapped, cheesecake keeps well for up to 5 days in the refrigerator.
- Freezing: Cheesecake freezes beautifully for up to 2 months. Wrap individual slices or the whole cake (without toppings) in plastic wrap, then aluminum foil.
- Thawing: Thaw frozen cheesecake overnight in the refrigerator for best results.
- Crust preparation: The graham cracker crust can be made and baked up to 2 days ahead and stored, covered, at room temperature.
Health Conscious Adaptations
While New York cheesecake is undeniably an indulgence, these modifications make it slightly more nutritionally balanced:
- Reduced fat: Substitute up to half the cream cheese with Neufchâtel cheese
- Sugar alternatives: Experiment with natural sweeteners like honey (use 3/4 cup for 1 cup sugar)
- Gluten-free crust: Use gluten-free graham crackers or almond flour crust
- Greek yogurt: Replace sour cream with Greek yogurt for extra protein
- Portion control: Mini cheesecakes in muffin tins with reduced baking time
Remember that these adaptations will change the authentic New York cheesecake texture somewhat, but can still yield delicious results.
Frequently Asked Questions
Q: Why did my cheesecake crack even though I used a water bath?
A perfect cheesecake requires multiple safeguards against cracking. Beyond the water bath, ensure you’re not overmixing after adding eggs, avoid opening the oven during baking, and follow the gradual cooling process. Even tiny variations in technique can affect results.
Q: Can I use low-fat cream cheese to reduce calories?
While you technically can, I don’t recommend it for an authentic New York cheesecake. The fat content is essential for proper texture and mouthfeel. If reducing calories is important, consider making mini cheesecakes for portion control instead.
Q: My crust got soggy even with foil protection. What went wrong?
Water bath leakage is a common problem. For extra protection, place your springform pan in a slightly larger cake pan before placing both in the water bath. Alternatively, use a silicone water bath protector specifically designed for cheesecakes.
Q: How do I know when my cheesecake is perfectly done?
The perfect cheesecake should still have a slight wobble in the center (about 2-3 inches in diameter) when gently shaken. The edges should be more set but not browned. For precision, an instant-read thermometer inserted in the center should read 150°F (65°C).
Q: Why is my cheesecake too dense and heavy?
Overmixing, especially after adding the eggs, incorporates too much air that then collapses during baking, resulting in a dense texture. Mix just until ingredients are combined at this stage. Also, be precise with measurements—too much flour or cream cheese can affect texture dramatically.
Q: Can I make this recipe without a stand mixer?
Yes, though it requires more effort. Use a hand mixer on medium-low speed, being especially careful to beat the cream cheese thoroughly until completely smooth before adding other ingredients. You may need to stop and scrape the bowl more frequently.
A Final Note
The perfect New York cheesecake is as much about technique as ingredients. Be patient with the process, from allowing ingredients to come to room temperature to the slow cooling and chilling steps. These aren’t just suggestions—they’re essential to achieving that iconic texture that makes New York cheesecake so beloved.
I hope this guide helps you create a cheesecake that becomes your signature dessert, the one friends and family request for special occasions. There’s something deeply satisfying about mastering this classic, and the rewards—both in the process and the eating—are well worth the effort.
Happy baking!
Q&A Section
Q: What’s the biggest mistake people make when baking cheesecake?
The number one error is overmixing the batter after adding the eggs. This incorporates too much air, which can cause the cheesecake to rise rapidly during baking and then collapse and crack while cooling. Mix just until each egg is incorporated, then stop.
Q: How far in advance can I make a cheesecake?
This is why cheesecake is perfect for entertaining—you can make it up to 3 days ahead and keep it refrigerated. For longer storage, cheesecake freezes beautifully for up to 2 months. Just thaw overnight in the refrigerator before serving.
Q: Do I really need to use a water bath?
For authentic New York cheesecake texture—creamy throughout with no curdling or cracks—yes, the water bath is essential. However, if you’re in a pinch, you can place a pan of water on the rack below your cheesecake to create humidity in the oven, though results won’t be quite as perfect.
Q: My springform pan always leaks with water baths. Any solutions?
Beyond the triple layer of heavy-duty foil, try placing your wrapped springform pan inside a slightly larger regular cake pan before placing both in the water bath. Alternatively, invest in a silicone water bath wrap designed specifically for springform pans—they’re reusable and much more reliable than foil.
Q: What’s the best way to bring ingredients to room temperature quickly?
If you forgot to set out your ingredients ahead of time, there are some shortcuts: Cut cream cheese into cubes and spread out on a plate (about 30 minutes). Place eggs in warm (not hot) water for 5-10 minutes. Microwave sour cream and heavy cream for just a few seconds, stirring frequently and checking temperature.
Q: Can I substitute Greek yogurt for sour cream?
Yes, full-fat Greek yogurt makes an excellent substitute for sour cream in cheesecake. The texture and tanginess are very similar, and some bakers prefer it for the slight protein boost it provides.
Q: Why is my cheesecake always taller at the edges and sunken in the middle?
This usually happens when the edges bake faster than the center. Make sure your oven temperature is accurate with an oven thermometer, use a water bath, and position the rack in the middle of the oven. Additionally, make sure you’re not overbaking, as this intensifies the doming effect.
Q: Is it normal for a cheesecake to jiggle when it’s done?
Yes! A perfectly baked cheesecake should still have a slight wobble in the center when you gently shake the pan—about a 2-3 inch diameter in the middle should jiggle slightly. The residual heat will continue cooking it as it cools, so removing it at this stage prevents overbaking.