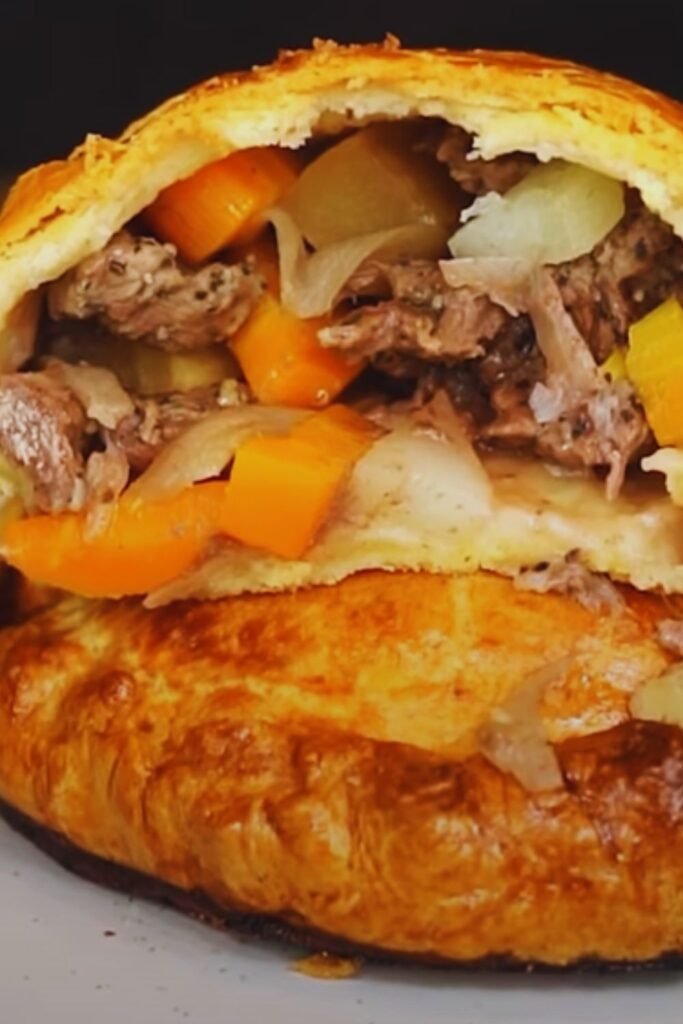
There’s something incredibly comforting about biting into a warm, freshly baked Cornish pasty with its golden crust giving way to a savory filling of tender meat and vegetables. Having grown up watching my grandmother fold these little pockets of joy in her kitchen, I’ve developed a deep appreciation for this humble yet remarkable dish that carries centuries of history and tradition.
Today, I’m thrilled to share everything I know about authentic Cornish pasties – from their fascinating origins to a step-by-step recipe that honors traditional methods while being accessible for home cooks. Whether you’re a seasoned baker or trying your hand at pasties for the first time, this guide will help you master this iconic British dish that has stood the test of time.
The Rich History of Cornish Pasties
The Cornish pasty isn’t just any meat pie – it’s a cultural icon with protected status and a fascinating backstory that dates back hundreds of years.
From Miners’ Lunch to Protected Delicacy
Cornish pasties were originally created as portable lunches for tin miners in Cornwall, England. The distinctive D-shape with its crimped edge served a practical purpose – miners could hold the pasty by the crimped crust with their dirty hands and still enjoy a clean meal. The thick edge also provided insulation, keeping the filling warm for hours.
What I find particularly clever is how some pasties historically featured both savory and sweet fillings – main course and dessert in one portable package! The miners’ wives would mark one end with an initial so their husbands would know which end contained which filling.
In 2011, the Cornish pasty received Protected Geographical Indication (PGI) status from the European Union. This means that only pasties made in Cornwall following the traditional recipe can officially be called “Cornish pasties” – a testament to their cultural significance and distinctive heritage.
The Cultural Significance
Beyond their practical origins, Cornish pasties have become deeply embedded in Cornish identity. Annual competitions celebrate the best pasty makers, with fierce debates about what constitutes an authentic version. When Cornish miners emigrated around the world during the 19th century, they took their pasty tradition with them, establishing regional variations in places like Michigan’s Upper Peninsula in the US and parts of Australia.
I once visited a small mining town in Michigan where they celebrate “Pasty Fest” every summer – complete with pasty-eating competitions and historical reenactments showing how miners would warm their pasties on shovels over mining lamps!
What Makes an Authentic Cornish Pasty?
According to the Cornish Pasty Association, which championed the PGI status, an authentic Cornish pasty must adhere to specific requirements:
- Must be made in Cornwall
- Must have a distinctive ‘D’ shape with the edge crimped on one side
- Must contain roughly diced or minced beef, swede (rutabaga), potato, and onion
- Must have a robust pastry casing that can withstand being carried
- Must be crimped on the side, not on top
- Must be slow-baked
- Must not contain carrots (a controversial modern addition!)
While only pasties made in Cornwall can officially bear the name “Cornish pasty,” I believe we can still create delicious traditional-style pasties that honor these centuries-old techniques and flavors.
Essential Ingredients for Traditional Cornish Pasties

The beauty of Cornish pasties lies in their simplicity. Just a handful of quality ingredients transform into something truly special:
For the Pastry
| Pastry Ingredient | Amount | Notes |
|---|---|---|
| All-purpose flour | 500g (4 cups) | Cold from the refrigerator |
| Unsalted butter | 125g (1/2 cup) | Cold, cubed |
| Lard or vegetable shortening | 125g (1/2 cup) | Cold, cubed |
| Salt | 1 teaspoon | Fine sea salt works best |
| Cold water | 120-150ml (1/2-2/3 cup) | Ice water preferred |
For the Traditional Filling
| Filling Ingredient | Amount | Notes |
|---|---|---|
| Chuck steak or skirt beef | 400g (14oz) | Cut into 1cm (1/2 inch) cubes |
| Potato | 300g (2 medium) | Peeled and diced into 1cm cubes |
| Swede (rutabaga) | 200g (1 small) | Peeled and diced into 1cm cubes |
| Onion | 150g (1 medium) | Finely diced |
| Salt | 1 teaspoon | Or to taste |
| Black pepper | 1/2 teaspoon | Freshly ground |
| Butter | 25g | Small pieces for dotting |
For the Finish
- 1 egg, beaten (for egg wash)
- Pinch of salt (for egg wash)
Key Ingredient Notes:
Beef: Traditionally, skirt steak is used for its flavor and texture. I find chuck steak works wonderfully too, providing the right balance of meat and fat. The meat goes in raw – a crucial authentic touch!
Swede: Known as rutabaga in North America, this root vegetable provides a distinctive sweetness that’s essential to the traditional flavor. Don’t substitute with other vegetables if you’re aiming for authenticity.
Pastry: The ratio of fat to flour is critical for achieving that perfect robust yet flaky texture. Using a combination of butter and lard/shortening gives the best results – butter for flavor, lard for texture.
Seasoning: While the traditional recipe is simple with just salt and pepper, I sometimes add a pinch of fresh thyme. Purists might frown, but I find it enhances the savory notes beautifully without overwhelming the classic flavor profile.
Step-by-Step Recipe for Traditional Cornish Pasties
Making the Perfect Pastry
- Prepare your workspace: I always start by chilling all my ingredients and even the mixing bowl. Cold ingredients are crucial for flaky pastry.
- Mix the dry ingredients: In a large bowl, combine the flour and salt.
- Incorporate the fat: Add the cold cubed butter and lard/shortening to the flour. Using your fingertips, rub the fat into the flour until the mixture resembles coarse breadcrumbs with some pea-sized pieces of fat still visible. Work quickly to prevent the fat from warming.
- Add cold water: Sprinkle about 120ml (1/2 cup) of ice-cold water over the mixture and stir with a knife. Add remaining water a tablespoon at a time until the dough just comes together but isn’t sticky.
- Rest the dough: Form the dough into a disk, wrap in plastic wrap, and refrigerate for at least 30 minutes (or up to 24 hours). This resting period allows the gluten to relax and the fat to firm up again.
Preparing the Filling
- Prep your vegetables: While the dough is resting, prepare your filling. Peel and dice the potato, swede, and onion. The traditional dice is about 1cm (1/2 inch) – not too fine, not too chunky.
- Prepare the meat: Trim any excess fat from the beef and cut into similar-sized cubes as the vegetables.
- Combine filling ingredients: In a large bowl, mix the diced beef, potato, swede, and onion. Season generously with salt and pepper. The raw ingredients will release their flavors during baking to create a delicious gravy inside the pasty.
Assembly and Baking
- Roll the pastry: Remove the dough from the refrigerator. On a lightly floured surface, roll out the pastry to about 3-4mm thickness. Using a plate or bowl as a guide, cut out circles approximately 20cm (8 inches) in diameter.
- Fill the pasties: Place about 125g (4-5oz) of filling mixture slightly off-center on each pastry circle. Dot with small pieces of butter – this will help create a moist filling as it melts during baking.
- Form the pasty: Brush the edges of the pastry with beaten egg. Fold the pastry over to create a half-moon shape. Press the edges together firmly.
- Create the crimp: Starting at one end, fold the edge over and pinch to create a rope-like crimp along the curved edge. This is a critical step for an authentic Cornish pasty! The crimp should be on the side, not on top.
- Prepare for baking: Place the pasties on a baking sheet lined with parchment paper. Brush each pasty with beaten egg wash for a golden finish. Cut a small steam vent in the top of each pasty.
- Bake to perfection: Bake in a preheated oven at 165°C (330°F) for about 50-60 minutes until golden brown. The slow baking is traditional and allows the filling to cook thoroughly while the pastry becomes beautifully crisp.
- Rest before serving: Allow the pasties to rest for 5-10 minutes before serving. This gives the filling a chance to settle and the flavors to meld.
Common Mistakes to Avoid
In my journey to pasty perfection, I’ve made plenty of mistakes. Here are some pitfalls to avoid:
- Overworking the pastry: This develops too much gluten, resulting in tough rather than flaky pastry. Handle the dough minimally.
- Using pre-cooked meat: Traditional Cornish pasties use raw meat which cooks in its own juices, creating a natural gravy inside.
- Cutting vegetables too large or too small: Too large, and they won’t cook properly; too small, and they’ll disintegrate. Aim for consistent 1cm dice.
- Insufficient seasoning: The filling needs generous seasoning as it’s not pre-cooked.
- Overfilling the pasty: This can lead to burst seams and filling leakage. About 125g of filling for a 20cm pastry circle is ideal.
- Weak crimping: A proper crimp is both decorative and functional – it seals in the juices and flavors.
- Baking at too high a temperature: Traditional pasties need slow baking to properly cook the filling while developing that perfect golden crust.
Variations: Traditional vs. Modern Approaches
While I deeply respect tradition, I also appreciate thoughtful innovation. Here are some variations that might interest the curious cook:
Traditional Elements Worth Preserving
- The D-shape and side crimp: These are defining characteristics of a proper Cornish pasty.
- Raw filling ingredients: This traditional method creates a moister, more flavorful result than pre-cooking.
- Basic seasoning: The simple salt and pepper approach allows the quality ingredients to shine.
Acceptable Modern Variations
- Adding herbs: A small amount of thyme or parsley can enhance the traditional flavors.
- Gluten-free pastry: For those with dietary restrictions, a good gluten-free pastry can still produce excellent results.
- Regional fillings: While not “Cornish” in the strict sense, different regions have developed their own beloved fillings – from Michigan pasties with carrots to Mexican empanadas inspired by Cornish miners.
My Favorite Subtle Twist
I occasionally add 1/2 teaspoon of English mustard powder to the filling mixture. It’s barely detectable as mustard but adds a depth that complements the beef wonderfully. Is it traditional? No. Is it delicious? Absolutely!
Serving Suggestions and Pairings

Traditionally, Cornish pasties were eaten as a complete meal on their own, but there are several delightful ways to serve them:
Classic Accompaniments
- Proper English gravy: Some enjoy dipping their pasty in a small bowl of rich beef gravy.
- HP Sauce or ketchup: These classic British condiments pair wonderfully with pasties.
- Pickled red cabbage: The tangy crunch offers a perfect contrast to the rich pastry.
- Simple green salad: A light, vinaigrette-dressed salad provides a fresh counterpoint.
Drink Pairings
- Traditional cider: The slightly tart flavor cuts through the richness of the pastry.
- English tea: A strong cup of black tea is the miner’s choice.
- Ginger beer: The spicy warmth complements the savory filling beautifully.
- Apple juice: For a non-alcoholic option that pairs wonderfully with the flavors.
Temperature Considerations
While many prefer pasties piping hot from the oven, they’re traditionally eaten at room temperature as miners would have done. I find they’re delicious both ways, though the flavors are more pronounced when not scalding hot.
Storing, Freezing, and Reheating
One of the many virtues of Cornish pasties is their make-ahead potential:
Storage
- Freshly baked: Cool completely, then wrap in parchment and store in an airtight container in the refrigerator for up to 3 days.
Freezing Options
Cornish pasties freeze beautifully in two ways:
- Freeze before baking: Assemble the pasties completely but don’t egg wash. Freeze on a tray until solid, then wrap individually and store in freezer bags for up to 3 months. Bake from frozen, adding 15-20 minutes to the baking time, applying egg wash just before baking.
- Freeze after baking: Cool completely, wrap individually, and freeze for up to 2 months.
Reheating Methods
- From refrigerated: Warm in a 160°C (320°F) oven for 15-20 minutes.
- From frozen (already baked): Thaw in the refrigerator overnight, then reheat as above, or reheat from frozen at 150°C (300°F) for about 30-35 minutes.
- Microwave method: While purists might frown, a refrigerated pasty can be microwaved for 2-3 minutes if you’re in a hurry, though the pastry won’t be as crisp.
Nutritional Considerations
Traditional Cornish pasties are hearty fare designed to sustain hardworking miners:
| Nutritional Element | Approximate Value per Pasty | Notes |
|---|---|---|
| Calories | 650-750 kcal | Varies with size and exact ingredients |
| Protein | 25-30g | Primarily from the beef |
| Carbohydrates | 65-75g | Mainly from the pastry and potatoes |
| Fat | 35-40g | From pastry and beef |
| Sodium | 800-1000mg | Can be reduced with less salt |
| Fiber | 4-6g | From vegetables |
While not a low-calorie option, Cornish pasties provide a well-balanced, satisfying meal with protein, carbohydrates, and vegetables all in one package. For a lighter version, you might consider:
- Reducing the pastry thickness slightly
- Increasing the proportion of vegetables to meat
- Using a leaner cut of beef
- Making smaller pasties for portion control
That said, sometimes the traditional approach is worth the indulgence – especially when sharing this cultural heritage with family and friends.
Troubleshooting Common Issues
Even experienced bakers encounter challenges with pasties. Here are solutions to common problems:
Soggy Bottom Pastry
Problem: The bottom of the pasty is undercooked or soggy. Solution: Bake pasties on a preheated baking sheet, position the rack in the lower third of the oven, or blind bake the bottom briefly before adding filling.
Dry Filling
Problem: The filling seems too dry after baking. Solution: Add small dots of butter to the filling before sealing, ensure your meat has some fat content, and don’t overcook the pasties.
Broken or Leaking Crimps
Problem: The pasty seam opens during baking, leaking juices. Solution: Ensure you’ve properly moistened the edge with egg wash before crimping, crimp more tightly, and make sure not to overfill.
Tough Pastry
Problem: The pastry is tough rather than flaky. Solution: Minimize handling of the dough, ensure all ingredients are cold, and don’t skip the resting period.
Undercooked Vegetables
Problem: The vegetables are still hard after the full baking time. Solution: Cut vegetables into slightly smaller, consistent pieces, or consider par-cooking the swede if it’s particularly firm.
Q&A Section: Common Questions About Cornish Pasties
Q: What’s the correct way to pronounce “pasty”? The word rhymes with “nasty,” not with “hasty.” It’s PASS-tee, not PASTE-ee.
Q: Are carrots traditional in Cornish pasties? No, carrots are not included in the traditional recipe protected by PGI status. Traditional Cornish pasties contain only beef, potato, swede (rutabaga), and onion. However, many regional variations do include carrots.
Q: Can I make a vegetarian version of a Cornish pasty? While it wouldn’t be a traditional Cornish pasty, vegetarian versions can be delicious. Consider a filling of potato, swede, onion, and cheese, perhaps with some additional herbs for flavor complexity.
Q: Why does the crimping have to be on the side and not on top? Side-crimping is the traditional method used by Cornish miners’ wives. It created a sturdy edge that miners could hold onto with dirty hands, using the crimped portion as a disposable “handle.” Top-crimped pasties are more characteristic of Devon or other regions.
Q: Why aren’t Cornish pasties made with a hole in the top like other pies? Traditional pasties rely on the side crimp to allow minimal steam to escape while keeping the filling moist. A hole would allow too much moisture to evaporate during the long, slow bake needed to cook the raw ingredients properly.
Q: Can I freeze Cornish pasties? Absolutely! Cornish pasties freeze exceptionally well, either before or after baking. See the detailed freezing instructions in the storage section above.
Q: How can I tell when my pasty is properly cooked? A properly cooked pasty will have a golden-brown crust and, if you insert a skewer through the center, it should go through the vegetables with minimal resistance. The internal temperature should reach at least 75°C (165°F).
Q: Is it true that miners threw away the crimped edges? There’s historical evidence suggesting some miners would discard the crimped edge after eating the main portion, particularly when working with arsenic-laden tin. The crimp served as a handle, potentially contaminated by their unwashed hands. Other accounts suggest the crimp was sometimes marked with initials and contained a dessert filling!
Conclusion: Keeping Tradition Alive
There’s something profoundly satisfying about making Cornish pasties from scratch – connecting with centuries of tradition while creating something that’s both practical and delicious. Every time I crimp a pasty edge, I feel a connection to those Cornish miners and their families who relied on this ingenious portable meal.
What I love most about Cornish pasties is how they embody the essential wisdom of traditional cooking: simple ingredients, thoughtful preparation, and practical design coming together to create something greater than the sum of its parts.
Whether you’re making these for a family dinner, packing them for a picnic, or connecting with your Cornish heritage, I hope this guide helps you create pasties that would make Cornwall proud. The beauty of cooking traditions is that each generation adds its touch while honoring what came before – so don’t be afraid to make these pasties your own.
Now, with flour-dusted hands and the smell of baking filling your kitchen, you’re part of a culinary tradition that has spanned centuries and continents. Happy baking!
Q&A Section
Q: Can I use puff pastry instead of making pastry from scratch? While you can use puff pastry in a pinch, traditional Cornish pasties use a sturdier shortcrust pastry that holds up better to the filling and handling. The traditional pastry also has a better texture contrast with the filling.
Q: How long will the pasties keep if I make them ahead? Freshly baked pasties will keep in the refrigerator for up to 3 days. They can also be frozen for up to 2 months.
Q: Can I add other vegetables to my pasty filling? Strictly speaking, an authentic Cornish pasty contains only beef, potato, swede, and onion. Adding other vegetables makes it a different type of pasty, but that doesn’t mean it won’t be delicious! Just be aware it wouldn’t be considered traditional.
Q: Why do my pasties sometimes get a soggy bottom? This often happens when the filling releases too much moisture during baking. Make sure your filling ingredients aren’t wet when you assemble the pasties, bake on a preheated baking sheet, and consider positioning your oven rack in the lower third of the oven.
Q: What’s the secret to a good crimp? Practice! The traditional Cornish crimp involves folding the edge over and pinching it at regular intervals to create a rope-like pattern. The key is to make sure each pinch seals completely while creating a decorative edge.
Q: Is it better to eat pasties hot or cold? This is entirely personal preference. Traditionally, miners would eat them at room temperature, but many people today prefer them warm. They’re delicious either way!
Q: Why do we put raw meat in the pasty instead of browning it first? Using raw meat is traditional and creates a moister filling as the meat releases its juices during the slow baking process. These juices combine with the butter to create a natural gravy inside the pasty.
Q: Can I make mini pasties for appetizers? Absolutely! Simply cut smaller circles of pastry and reduce the filling accordingly. Mini pasties will need less baking time – usually about 25-30 minutes instead of 50-60.